Posts

Showing posts from February, 2018

Dealing with Falco's Lasers as Bowser

Falco gets to dictate the pace of the neutral game in a way that no other character can due to the power of his lasers. Asking for Falco advice generally leads to being told stuff like "learn to deal with lasers", which while true, I don't think is as helpful as it could be. Due to their versatility in application, there's hardly going to be a one-size-fits-all solution to working around Falco's lasers. I think there are a lot of Falco players at low-mid level who use lasers and rely on them fully shutting down their opponent's movement. While it's not an unfounded assumption to think lasers can shut down movement, they definitely aren't perfect. In this writeup, I'm going to detail movement options that Bowser can use even while under incredible laser pressure. Note that although this writeup is centered around Bowser's options, most of them aren't fully Bowser-specific, and the methodologies would be transferable between characters. TA...
Bowser Video Archive

This post hopes to be a resource for quickly finding footage of Bowser for analysis or combo video reasons. Each name on this list is clickable and will lead to a playlist. I will try to keep this updated, but obviously that will be hard-- if there are notable matches missing from the playlists, you can message me and I'll get it added ASAP. Matchup Playlists: (70)  Bowser vs Fox (29)  Bowser vs Marth (67)  Bowser vs Falco (12)  Bowser vs Jigglypuff (38)  Bowser vs Sheik (23)  Bowser vs Captain Falcon (15)  Bowser vs Peach (3)  Bowser vs Ice Climbers (14)  Bowser vs Samus (6)  Bowser vs Luigi (2)  Bowser vs Pikachu (3)  Bowser vs Yoshi (13)  Bowser vs Ganon (3)  Bowser vs Dr. Mario (11)  Bowser vs Mario (1)  Bowser vs Young Link (6)  Bowser vs Donkey Kong (6)  Bowser vs Link (2)  Bowser vs Mr. Game and Watch (1)  Bowser vs Pichu (10)  Bowser vs Mewtwo (1)...

Bowser Controller Grip and Movement Methodology

Image
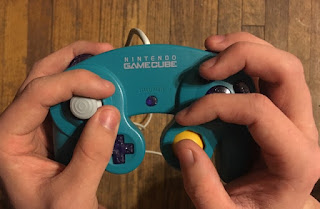
**Correction: In previous versions of this writeup, I was using extremely unconventional terms to refer to the different mechanics behind what is commonly known as Crouch Cancelling. CC is composed of two independent mechanics, the Crouch knockback reduction, and the ASDI down portion. For the purposes of this writeup, I will refer to ASDI-down as "Ground Cancelling" aka GC, and the Crouch knockback reduction as CC. Thank you to /u/cagliostro9 and /u/Bones_Zero for talking me through the common naming conventions for the mechanics.** In the Bowser discord , we've been toying with different ideas for what the ideal controller grip for Bowser might be. This might seem like an easy question, but in fact there's a lot of room for movement optimization with unconventional controller grips. The conventional controller grip involves only two actionable fingers on the face of the controller, and an additional two on the triggers. If you can hold the controller in such a way...

Bowser's Ledgehop Fortress Cancel

Image
Bowser can do a really neat little thing where if he lands within 2 frames of his aerial Uspecial ending, he will get a No-impact Land on the ground. This is called a "Fortress Cancel", as it cancels the landing lag his Uspecial would normally have. Doing this from ledge has a lot of potential for quick attack links and general stage movement with a passive hitbox. I will describe two methods here. Both have a 2-frame window to hit the Uspecial, the difference is in if you're doing a "perfect" Uspecial input or not. It can be pretty hard to do an aerial Uspecial without burning your doublejump, so I'd personally recommend just accounting for single doublejump frame before the Uspecial's start with your practice. Basically, after your 8 mandatory cliffcatch frames that begin any ledgegrab animation, you want to drop off of the ledge without fastfalling, then input your Uspecial directly after either the 8th or 9th frame of dropping. Assuming you d...

Bowser's Haxdash

Image
Bowser's Haxdash is frankly a little impractical considering how he has such an easy alternative for refreshing intangibility with his Ledgehop Doublejump Intangibility Refresh . I found a nifty setup for it that has a frame of leniency for the controller polling, though, so I thought it wouldn't hurt to post the setup to potentially grind it out later. Basically, you need to drop from the ledge after your 8 mandatory cliffcatch frames that start any ledgegrab. On the frame immediately following the drop from ledge, input a doublejump drifting towards the stage, and hold that drift for 16 frames. Then, on the 17th frame, you roll the input from drifting inwards towards the stage to down and very slightly backwards towards the ledge, and on frame 17 you hit the trigger button to start an airdodge. Then you have 3 frames of airdodge before you become grounded, then an additional 3 frames of sliding on the stage, 2 airborne frames after you slide off before you can fastfall,...

Bowser's Ledgehop Aerial Edgecancel Regrab

Image
Bowser's aerials are really slow and clunky, so if you are able to cancel their lag, you're usually best off doing it. He already has a fairly strong ledge game due to his fairly good ledgedash and amazing low percent ledge getup attack, but pushing that advantage even further is necessary to competing in today's meta. One of his best ways to push the advantage near the edge is to utilize his ability to perform ledgehop aerial edgecancel regrabs. With this technique, Bowser is able to put out a fully intangible aerial hitbox, then regrab the edge, thus suffering almost no landing lag whatsoever. This can have a myriad of practical applications, like using Fair to push people away who are trying to contest your space at the ledge, putting out a quick intangible Bair hitbox for easy gimps, or covering multiple options with an edgeguard by covering high with a hitbox then covering low with a ledgehog. Performing the input consistently can be very difficult, and thus fi...

Bowser's Ledgehop No-impact Land

Image
Bowser is able to do quick grounded attacks from the ledge by utilizing his easy no-impact land. While this is largely outclassed by ledgedash for doing attacks quickly in towards the stage, it's a pretty nifty tool for edgeguarding and general stage movement. It can be used in edgeguards by doing things like immediate downwards-angled Ftilt back off the stage after the NIL in order to cover certain recoveries, like Fox and Falco's Fspecials. The inputs are super simple, after your inital 8 frames of mandatory cliffcatch animation that start your ledgegrab, you want to fastfall for exactly 4 frames, then doublejump in towards the stage. On the 26th frame of your doublejump, you will be fully grounded with no down time between your airborne and grounded states. Although that is your first grounded frame, the way no-impact lands work means that if you try to put out an attack on that frame exactly, the game will assume you're still airborne, and you will do the aerial v...

Bowser's Ledgedash

Image
Please note that I have optimized the inputs for Bowser's ledgedash assuming you are using the claw controller grip, as it allows for the most consistency in performing the tight inputs required for performing a perfect ledgedash. Bowser's ledgedash is a very good tool, as when it's done perfectly, you're able to get an Uspecial out before your intangibility runs out, due to him having 7 GALINT (Grounded ledge intangibility) frames after his ledgedash completes.This means you can get out a fully intangible grounded Uspecial, Utilt, or Jab. To perform the ledgedash, you should let go of ledge with a horizontal C-stick input directly away from the ledge on the first actionable frame after the 8 mandatory cliffcatch frames that start a ledgegrab. Then, on the frame immediately following the drop from ledge, input a doublejump while drifting inwards. After 11 frames of rising with the fading in doublejump, input a waveland down and in towards the stage. Luckily, with B...

Bowser's Low Percent Ledge Getup Attack Regrab

Image
Bowser has pretty much inarguably the best getup attack from ledge in the entire game, reaching incredibly far into the stage to knock people down with insanely fast speed, and also being able to reverse hit opponents back off of the stage which can have numerous edgeguarding applications. In order to properly utilize this tool though, acting out of it can be incredibly important. The two most commonly applicable ways of regrabbing the ledge after using a getup attack are doing a quick wavedash fastfall to the ledge, or performing a Fortress Hog with his Uspecial. For both variations, you will perform the getup attack on the 9th frame after you grab ledge, immediately following your mandatory cliffcatch frames you must go through each time you grab it. The getup attack is active on the 8th frame, and fully invincible through until the 34th frame of the animation, then you're actionable after the 54th frame of the animation. On the 55th frame after you perform the getup attack...

Bowser's Ledgehop Aerial Uspecial Regrab

Image
Bowser is able to ledgehop and perform and aerial attack, then Uspecial back up to grab ledge with four of his five aerial attacks (all except Dair). He is able to do all of these with full intangibility on the active frames of these attacks. Being able to perform this is crucial not only to fully maximize his edgeguarding game from their use, but also for building general ledge comfortability so that you don't die from silly missed inputs. The way the input works is first you go through the mandatory cliffcatch frames at the beginning of a cycle, then do one frame of falling from the ledge, followed by one frame of empty doublejumping before you input your aerial. After your aerial of choice's animation is complete, you can perform a Uspecial to get back to ledge. The earliest you can input an Uspecial is obviously dependent on move choice-- Here is the total frame count for each of Bowser's aerial attacks: Uair: 47 Bair: 49 Fair: 45 Nair: 49 Dair: 79 (A fun ...

Bowser's Ledge Intangibility Refresh

Image
Bowser has one of the easiest ledge intangibility refreshes in the game, needing only to fastfall and doublejump to retain a cycle of full intangibility. Ideally, staying fully invincible at the ledge should be something you're able to do without even thinking about it-- you should be using that time to look at your opponent and react to how they're moving about the stage to try and find an opening. Since it's composed of just two actions, fastfalls and doublejumps, there is actually a wide range of frame data with which the technique will work. I will detail the two that I have personally practiced, the lowest and highest variations of the intangibility refresh. For the lowest variation of the technique, the inputs are very simple. It just requires a fastfall from the ledge as soon as you're actionable, then a doublejump after 7 frames. It's important to note that you're still fully invincible if you fastfall for 6 or 8 frames as well as the 7 frames desc...